9 Ways to Improve Your Guitar Improvisation
Improvising on guitar is one of the most fun skills there is. Few things are more fun than putting on a good backing track and jamming over it for hours on end! But how do you improve your improvising on guitar? In this article we will look at some ideas that you can start using to improve - today!
If you are new at improvising, then check out the [beginners guide on how to start improvising on guitar]( {{ < ref “/blog/2018-05-20-improvise-guitar-even-complete-beginner” >}} ).
Before we look at the ways we can improve our improvising, we should take a minute to talk about what it is we want to accomplish when we improvise on guitar.
What is the Goal With Improvising On Guitar?
So why are we doing this? Well, mainly because it’s fun! It’s a great way to work on a lot of musical skills simultaneously.
Improvising is the art of spontaneous composition.
We are looking at creating small pieces of music, phrases and ideas on the spot. We are spontaneously reacting to the music we hear, trying to predict what will happen next, and compose for what we think is about to happen.
So, if we know some basic rules of composition, melody and structure; we can apply those rules to our improvising to dramatically increase the quality of our playing.
So here are 9 different ways you can improve at improvising on guitar:
1) You Have to Master Some Basic Skills
There are a few skills that you really need to get under your fingers before we start to seriously look at improving your improvising.
In order to use more advanced approaches to improvising, it’s essential to [know where the notes are on guitar]( {{ < ref “/blog/2021-03-10-how-to-memorise-the-notes-on-guitar” >}} ). If you don’t know this, then read the linked article and work through the exercises, memorising the notes on the guitar neck.
You also want to be very familiar with [playing all 5 positions of the minor pentatonic scale]( {{ < ref “/blog/2021-03-10-the-minor-pentatonic-scale-on-guitar” >}} ), and you should also have those memorised, and should be able to play them in multiple keys.
Once you have those under your figures, you will find the following much easier to try out!
Some people advise learning as many scales as possible, but this is actually a bad idea. Great improvising will come from mastering one scale first, figuring out how to use the following techniques, and then adding additional scales to your repertoire.
If you work on learning tons of scales first, your improvising will not improve musically or melodically; and it will just sound like you are hashing your way through a book of scales, rather than creating something that moves people when they listen to it.
2) Start Thinking in Terms of Sentences and Motifs
Often, when approaching improvising, a student tends to panic slightly, and play a big string of random notes. The student jumps all over the neck, playing random fragments of scales and playing as many notes as they can.
This is the biggest mistake that every beginner at improvising makes. So don’t worry if you do this, it’s to be expected!
Let’s do a little thought experiment.
Think of the longest book that you’ve ever read. Now, if that book was composed of a single sentence, across 100s of pages, would it be fun to read?
Probably not.
The book was broken down into sentences, paragraphs and chapters. This made it easy to read, and allowed the writer to convey something that we could understand.
Improvising is exactly the same.
When improvising, you don’t want a big random stream of notes. You want a carefully orchestrated sequence of ideas - even if all those ideas were not previously planned!
You want a nice series of sentences.
The easiest way to accomplish this, is to put pauses, or breaks in your soloing. You could just hold a note for a few seconds, every 4-5 notes.
Play a few notes, hold one. Play a few notes, hold.
Try and end on a chord tone - if you hold a dissonant note, it could sound very bad!
Another way to accomplish this is to play along to your breathing. Every time you breath in and out, hold the note you are on.
This will quickly start to create a sense of structure in your improvising.
Tip: How to Make Your Motifs More Melodic
Let’s talk quickly about how to make your motifs sound more melodic. If you play notes on the guitar, in the same scale, at either extreme, it’s easy for the notes to sound unrelated.
Our ear tends to recognises motifs, or sentences, as pieces of music where the notes are close to each other, and the total range of the phrase (or sentence) is with 1 - 2 octaves.
Try the following:
- Take two adjacent strings in a scale
- Play a short idea
- Move to two other adjacent strings
- Play a short idea
- Etc
You also want to keep the notes in the scale close to each other. Try to move between scale notes that neighbour each other.
3) Work on Your Rhythmic Creativity
Once you start creating phrases and sentences, you may fall into the trap of finding that they all sound very similar.
Often, this is down to the rhythm that we are using.
You see, the ear identifies similar phrases by the rhythm that is used. So, if we are using the same rhythm all the time, our phrases are going to sound very similar.
So, it’s time to work on your sense of rhythm!
An easy way to do this, is to write out a few different rhythms on paper. This way, you bypass all your natural tendencies and your “rhythm autopilot”.
Another benefit of using paper, is that you can quickly work through all the possible permutations of a rhythmic idea, which can be hard to keep track of if you use your guitar.
So, workout 10 different rhythms using pencil and paper.
Then, you want to take these ideas and clap them to a metronome. Yeah I know, this sounds a bit odd.
But the thing is, rhythm is purely in your head. Rhythm is mainly a conceptual skill, it’s the ability of your brain to process divisions in time.
Once you can clap a rhythm, playing it on guitar is much, much easier, than trying to play it on guitar straight away.
So clap the rhythms you wrote out. Once you can clap them to a metronome, take a scale on guitar and play the rhythm in your scale, or even better, use the rhythm to play a small segment of the scale.
Work through all the rhythms this way.
If you take a few minutes a day to work on your rhythmic creativity, you will quickly find new ideas and motifs coming out in your improvising.
4) Control Your Pitch Range
This is a super effective. Rather than play all over your guitar, play with more intention, choosing which ranges you play in.
Now, it doesn’t matter where you start your pitch range, what matters is when you change your pitch range.
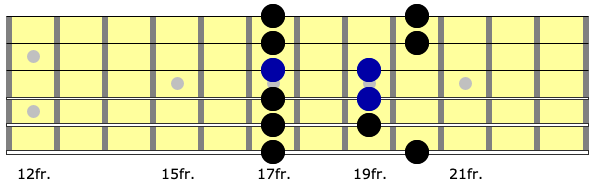
Start low down on the guitar. If you’re playing in the key of A minor, start with [position 5 of the minor pentatonic scale]({{ < ref “/blog/2021-03-10-the-minor-pentatonic-scale-on-guitar” >}}) on fret 3 on the 6th string.
Play along to a backing track, staying in that position.
When you hear a significant change in the backing track, as it moves to the next section, change your pitch range to position 1 of the minor pentatonic scale on the octave (fret 17).
Play around with changing the pitch range as you hear changes in the backing track you are using.
It will take you a little while to get used to this, but when you can do it… it sounds crazy effective!
It’s a very cool technique and worth investing some time into.
After trying out a few different combinations with pitch range, you will quickly find ideas that you like the sound of best, and you can use in your playing and improvising.
5) Practice Your Note Ornamentation
“It’s not what you play, it’s how you play it”.
While this isn’t strictly true, it gets the idea across that we are going to look at in this section.
With note ornamentation, we are talking about string bends, vibrato, legato, slides; and combinations of those skills.
Personally, I spent the first 10 - 14 years of playing guitar focussing purely on speed… and didn’t work on note ornamentation at all. And it showed in my playing - badly.
Improving note ornamentation was one of the biggest positive changes I made to my playing. And it actually makes the shredding sound so much better!
When people think of great guitar players that they enjoy listening to, they are thinking of plays with great note ornamentation - even if they can’t say it in those words.
How to Work on Note Ornamentation
Set a timer for 5 minutes, and focus on using that particular skill in your playing. It might sound rubbish, but keep going.
So for 5 minutes, for example, you just use slides when improvising.
The idea is to “over use” that skill. That gets you used to using it, and your brain will slowly, with time, figure out how to use it. While you practice this way, it will probably sound rubbish, but that is to be expected.
Remember: [Practising on guitar does not sound good!]({{ < ref “/blog/2021-03-10-are-you-practising-or-playing-guitar” >}})
6) Learn How to Use Melodic Techniques
When we looked at ornamentation, we were talking about how we play specific notes. When we talk about melodic techniques, we are talking about how we can change the melody that we are playing.
Different ways we can change the melody are:
- Adding any chord tone anywhere
- This includes adding arpeggios in as you please
- Adding non chord tones by nearest neighbour, or by step
- Changing the rhythm
- Suspensions
- Anticipations
- Appoggiatura’s
- Octave jumps
Learning what these techniques are, and applying them to your improvising (or composing!) on even a very simple level, will make dramatic improvements to how your improvising sounds.
7) Apply Sequencing to Your Improvising
This technique was a favourite of Vivaldi, and is very easy to do on guitar, due to the nature of the instrument.
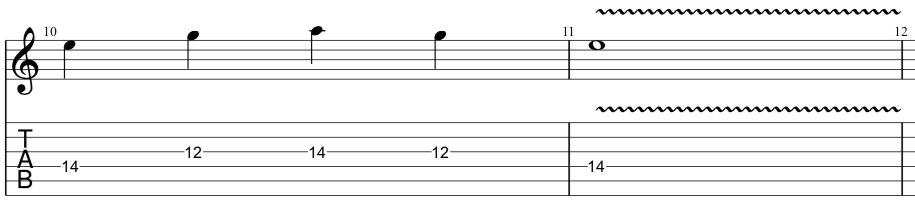
Sequencing is when you take a short melodic idea, and move it up through a scale, in steps.
For example, say we had the following idea with the minor pentatonic scale:
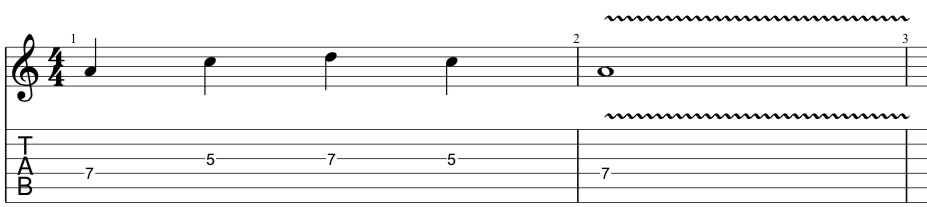
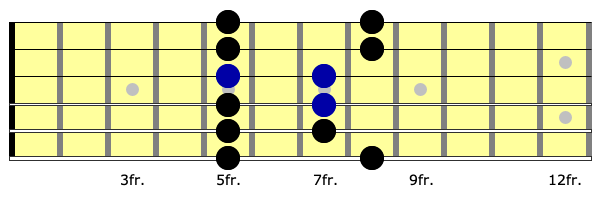
We would sequence this idea through the positions of the minor pentatonic scale as follows:
Position 2

Position 3

Position 4

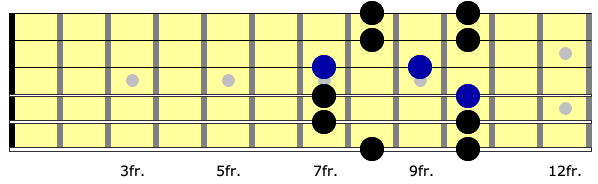
Position 5
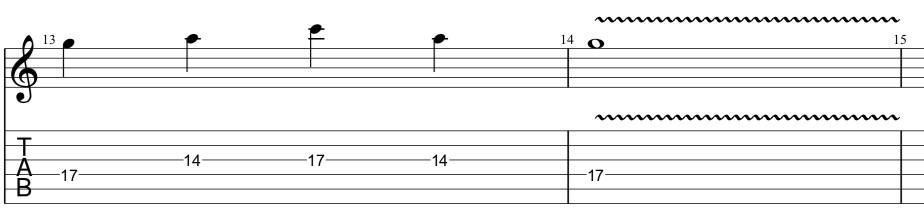
Position 1 (octave)
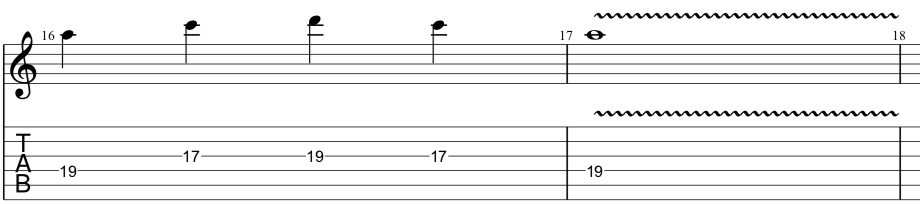
The Effect of Sequencing Licks on Your Listener
When you sequence a lick ascending through a scale like this, you create tension.
Now, when you create tension, you need to release it. A simple way to release the tension caused by an ascending sequence is to do something with the final part of the sequence.
It can be something really simple, the main thing is that we have a change compared to the preceding sequence.
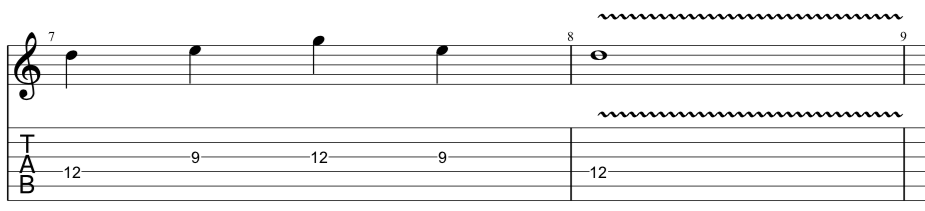
As an example, rather than play the last position of the sequence like the others, you could instead change the rhythm like this:
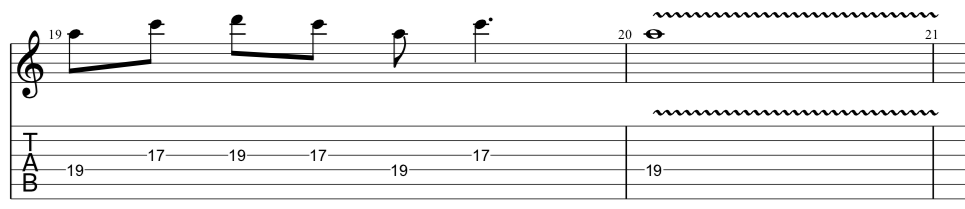
Note that I used the same notes, I just changed the rhythm. This helps the listener hear the tension-release lick as being the final art of the sequence, and not the start of a new phrase.
8) Listen to the Drums
I’m embarrassed to say that this technique eluded me for several years. A great way to improve your improvising is to listen to the drums.
Yeah I know… it sounds obvious. You probably do this already, but I added it in case you’re a slow learner, like me.
Following the drums is great for placing emphasis notes in your soloing, things such as:
- Ending a fast scale or arpeggio run on an accented drum beat with a big cymbal smash
- Matching a fast run up with a double bass pedal section
- Copying interesting rhythmic ideas from the drums in sections of your soloing
- Using dramatic note ornamentation with dramatic sections of the drums
9) Work On Your Ears
Doing ear training will dramatically help you improvise on guitar. When we talk about “improving your ears”, we are talking about ear training - training the ability to recognise chord progressions by ear.
If you practice improvising a lot, you will find that your ears naturally improve with time.
However, it would also be good to specifically practice ear training. There are plenty of apps online that can help you do this.
Bonus: How to Practice Improvisation So That You Can Improve
Some people would recommend practising improvising by putting on a backing track and just playing, and, while you will improve by doing that (given enough time), there are faster ways to improve at improvising.
As with everything else on guitar, the process of “Isolation - Repetition - Integration” can be used to improve your improvising.
Isolation
Pick one of the above skills and work purely on that skill, with no backing track.
For example, if you were working on sequences, you could take a short lick (it doesn’t need to be good), and practice sequencing it through your scales.
You want to work on this until you are comfortable stumbling through the technique. You don’t need to be able to use the technique perfectly, but at the same time, you don’t want to have to stop every minute to sit down with scale diagrams to figure out where the next part of your sequence is going.
I like students to get skills around 80% correct before moving onto the next step.
Repetition
Next, we are going to over practice using the technique to a backing track. You will want to pick a simple backing track, preferably one that you are familiar with.
Then, use the technique you are working on continuously over the entire backing track.
The goal here is not to create something that sounds cool! We are still working with getting to grips with the technique, this time with a bit of context.
You will find you have some pretty ropey ideas, and bum notes coming out, but that’s fine, just keep working on it.
Integration
Once you have played over a backing track (or a few backing tracks!) a few times, working on only using that one skill, you want to have a go at ‘integrating’ that new skill with the rest of your playing.
This means trying to use it a bit more tastefully than we did in the previous exercise!
So, you choose one of the backing tracks you’ve been working with, and now you start trying to use sequencing (for example) more tastefully, or naturally.
You play licks like you normally would, and frequently move into a sequencing lick or idea.
At this point, you are still using sequencing more frequently than you would “normally” use it. The main idea here, is to get used at transitioning in and out of sequences.
You may find your hands have to do something slightly different, and your brain certainly has to do something different, all of which take a little time to get used to.
Wrapping Up
You will find that, by working on these 9 areas of your improvising, following the short practice guide above, you start to slowly and consistently make progress with your ability to improvise.
There is a LOT to cover and it will take time, so be patient with yourself. Practice consistently, and before you know it, you will find yourself consistently improving at improvising on guitar.