How to write neoclassical style pedal point licks on guitar
Pedal points are a great way to get that neoclassical style sound into your improvising and soloing.
I’ve previously covered one way of writing pedal points, how to write a pedal point that ascends (or descends) through a scale.
Another way we can use pedal points is, instead of having a single note that we pedal, we use a short phrase. I refer to this as the “Pedal Phrase” or PP for short. I don’t know if this is the technical name, but it works.
The pedal phrase is constructed using a chord tone, a nearest neighbour, then the chord tone again:
CT NN CT
You can use any chord tone.
The nearest neighbour is the next note down in the scale, in the key that we are playing in.
Nearest Neighbour Example
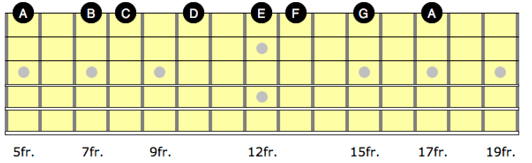
Let’s say we were playing in the key of A minor:
A B C D E F G
And are using the chord toneC. The nearest neighbour to C, is B. The nearest neighbour is the next note in the scale that is below the note we are looking at.
Keeping the Pedal Phrase on the Top of the Pedal Point
One way we can construct this style of pedal point, is by building it from an arpeggio.
We are going to walk through the process of building the entire pedal point, then we’ll look at the short cut for creating pedal points from arpeggio patterns.
We are going to use the following structure for the pedal point lick:
Pedal Phrase – Chord Tone 1 – Pedal Phrase – Chord Tone 2
In terms of pitch, we want the pedal phrase to be the highest part of the pedal point. We are going to place the two chord tones lower than the pedal point.
Don’t worry too much if you aren’t sure what this means, it will make more sense after working through an example.
Pedal Point Example 1
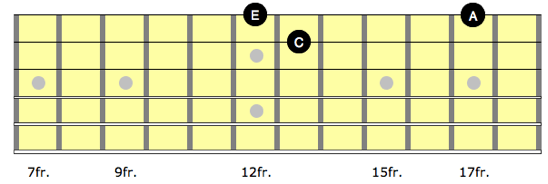
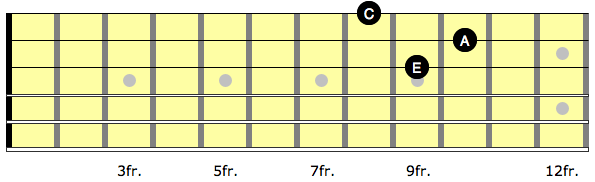
We will keep working in the key of A minor, with an A minor chord. We are going to build our pedal phrase from the chord tone E, and have the chord tones A and C move, underneath the pedal phrase.
Let’s play our pedal phrase on the high E string. We want to find E D E on the high E.
Let’s map out the one string A minor scale on the high E string:
then focus on the notes E D E:
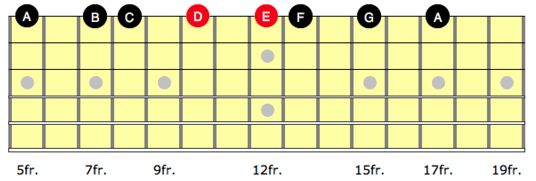
Which we can use to create the pedal phrase:

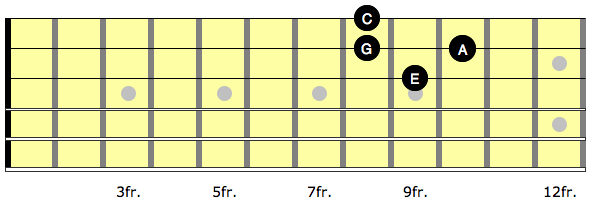
We previously stated that we are going to use chord tones around the pedal phrase. We want to use the two other chord tones (ideally) that are not in the pedal phrase.
As we are using an A minor triad (A C E), and we are using E in the pedal phrase (PP), we are left with A (which we will refer to as chord tone 1, CT1) and C (which we will refer to as chord tone 2, CT2).
We place the two chord tones lower than the pedal phrase, but also as close as possible to the pedal phrase. With this example, we can place the A and C here:
We then use the following formula to construct our pedal point lick:
PP CT1 PP CT2
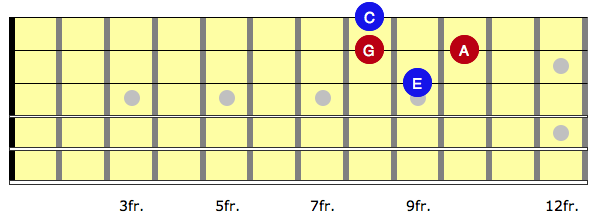
Which as tab will look like this:
And here is the tab with the different structures labelled:
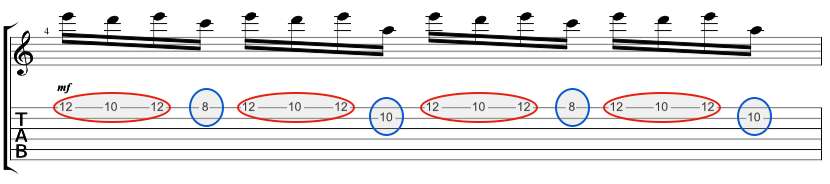
The pedal phrase (PP) is in red, and the chord tones that move around it (CT1 and CT2), are in blue.
As you may have noticed from the diagram with our chord tones and pedal phrase, the shape we have is a two string minor arpeggio, with a scale tone between the two notes on the highest string.
Using this shape, we can create a simpler process for creating pedal point licks, as follows:
- Map out the arpeggio, with two chord tones on the highest string
- Add a scale tone between the two highest chord tones
- Use the highest chord tone and the scale tone to create the pedal phrase
- Play the:
- Pedal phrase
- Chord tone
- Pedal phrase
- Chord tone
We will use this new process to work out a couple of examples:
Pedal Point Example 2
Take the following arrangement of the A minor triad, as an arpeggio, on strings 1 and 2:
Add the scale tone between E and A, that is closest to A:
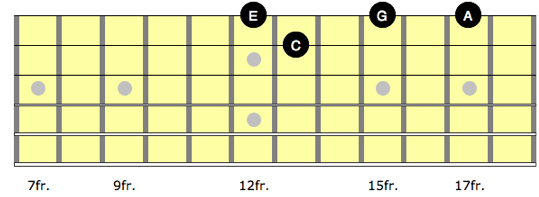
And then separate the arpeggio into the pedal phrase and the moving chord tones:

Then we can follow the formula of pedal phrases and chord tones:
PP CT1 PP CT2
Where we have:
PP: A G A CT1: E CT2: C
Which, written out in notes, gives us:
A G A E A G A C
And put into tab:

And here is the tab labelled:

The pedal phrase is in red and the chord tones in blue.
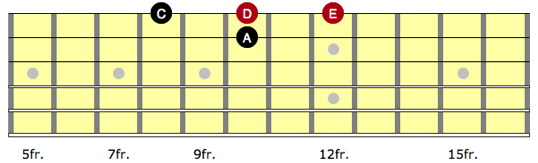
Let’s apply this idea with the last inversion we can have for A minor on the top two strings:
Pedal Point Example 3
Using A minor (A C E), with B as the scale tone that is added between the two notes (A and C) on the high e string:
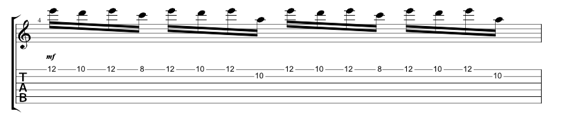
This would lead to the following pedal point lick:

Which we would explain in the following way:

Having the pedal phrase in the middle of the arpeggio
We can take the same ideas and have the pedal phrase in the middle of the arpeggio, with one chord tone higher and one chord tone lower.
We will work with an example of A minor again:
A minor triad: A C E

A minor scale: A B C D E F G
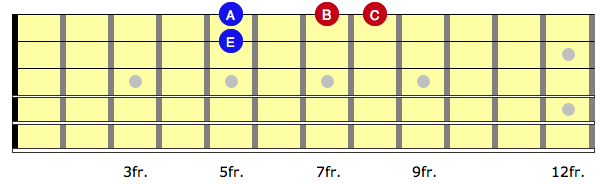
Mapping out A minor triad on the top three strings of the guitar, and placing the root note on the 2nd string, we get:
This time, we are going to find the next note in the A minor scale, down from the note on the 2nd string. We have A on the second string, so checking the A minor scale, we can see that G is the next note down:
So, we will use A and G to create the pedal phrase, and have E and C as the tones that move around the pedal phrase:
Because we have placed the pedal phrase in the middle of the arpeggio, we are going to change the formula we use, ever so slightly.
Previously, our formula for constructing the lick was:
PP CT1 PP CT2
Now, our formula will be:
CT1 PP CT2 PP
Which gives us the following tab:

Which we can explain the following way:

The pedal phrase (A G A) is in red, and the chord tones that we move around it, are in blue.
This is a similar structure to what Bach uses in Prelude 2 from the Well Tempered Clavier.
Now the formulas I used are not written in stone – you can change them any way you want. I used those formulas because:
- I like those sounds.
- It gives us a way to get started, showing how these ideas can be constructed.
Practising Pedal Points and Further Learning
It would be good to work out the following exercises:
Exercise 1 Take some other major and minor chords, and play around with creating pedal points.
Exercise 2 Take the chords from a harmonised scale. Write a chord progression that is 3-4 chords long. Then, using the above processes to build pedal points, write a pedal point progression based on the chords you used.
Warning: This will sound totally badass.
You could even add some overdriven powerchords underneath the pedal point… or [harmonise it]( {{ < ref “/blog/2021-04-26-lead-guitar-harmonies” >}}).