How to Improvise on Guitar
Often when it comes to improvising, a big reason people struggle is that they are trying to learn too much in one go, setting unrealistic or even impossible goals and expectations for themselves.
Overwhelm is one of the biggest problems guitar players face. It affects nearly every area of our playing.
And it affects our improvising, especially, when we are trying to apply scales over a chord progression.
Quick side note: This is aimed at getting anyone to be able to improvise on guitar. Even the most musically untalented person ever. If you are a bit more advanced, then this approach will still work for you… but you will move through the steps a lot faster. Back to business.
I’m going to break down learning to improvise into short bitesize stages, designed so that literally anyone who can hold down a string on the guitar, can learn to improvise.
Along the way, I’m going to give you concepts to think about and practical advice on applying those concepts to your playing.
We will work through the minor pentatonic scale in pairs of strings, to make memorising the scale very, very easy. Additionally, with each pair I will introduce 1 concept for you to think about and train yourself on.
Exercises are very clearly labelled for you to work on.
This will make learning to improvise much more manageable, easy… and fun for you.
Getting Started
Let’s say we were trying to use the minor pentatonic scale over a simple chord progression. Let’s also assume that all the chords in the progression work with the scale, so we don’t have to worry about changing keys / scales with the chords. So how much of the scale should we work with, to get started?
All 5 positions of the minor pentatonic scale?
Just one position?
I like to get students started with even less than that… I like to get them start with just two strings of the minor pentatonic scale. So they are not using the whole scale!
One of the problems when learning to improvise is that, not only is the student (you) working on memorising the scale, you are also trying to make music with it.
It’s like being given a foreign language dictionary and, reading it and then trying to speak that language fluently! Not going to happen.
When we learn a foreign language, we learn some words, we start building basic sentences that are a few words long, and then gradually build complexity with more advanced concepts.
We are going to take the same approach here.
So say for example you want to improvise using the A minor pentatonic scale:
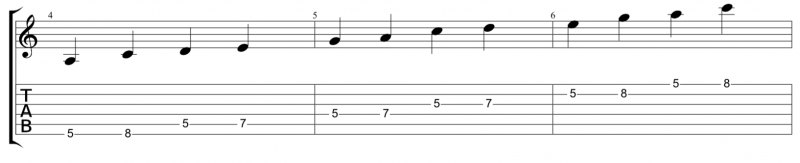
When it comes to tabs and diagrams, bear in mind that the tab is a guide to the neck diagram, it isn’t an instruction on the order in which you may or may not play the notes.
Now, for someone who is brand new to improvising… this is a lot of options. What usually happens is as soon as the backing track starts playing, the student isn’t sure what to do, or where to start. Or… in the face of all those options, they just play through the tab.
Stage 1
So here is how we get around that:
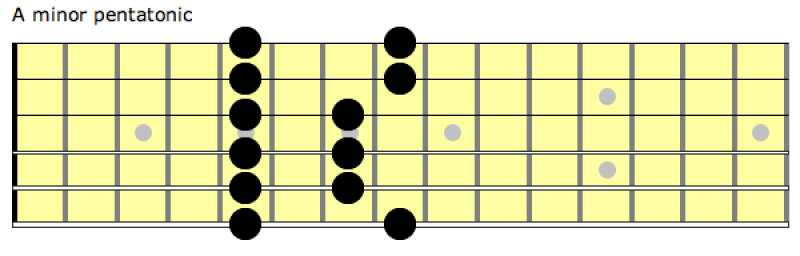
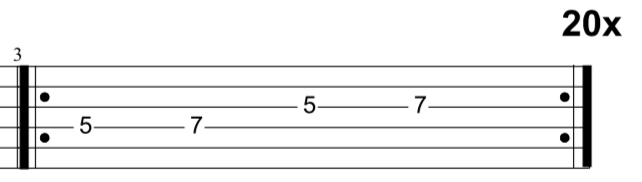
We are going to start with just the top two strings:
In case you wanted a bit of context, here is the complete scale, with the notes we are not using at this point in time marked as hollow circles:

What are we going to do?
First, play these notes repeatedly, 20 times in a row or so, just to get used to where they are on the neck:
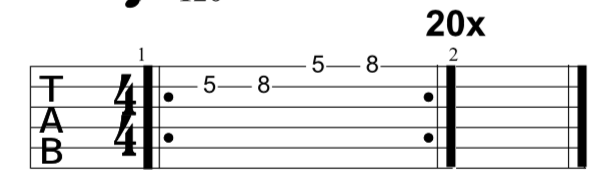
This is to program into our head where the frets are that we will be using.
Stage 1 Concept Shift We are not playing music. We are learning to play music. Next, we are going to put on a backing track… and play these notes in as many different combinations as possible.
THIS WILL NOT SOUND LIKE MUSIC
THIS WILL NOT SOUND GOOD
YOU PROBABLY WON’T LIKE HOW THIS SOUNDS
All of that is ok. Just do it.
In order to be able to improvise, you have to be able to take the notes in a scale and play them in a different order.
This is what we are training. We are training a very small component of one skill that you need.
This is NOT about making music – this is about training a very small component that will enable you to make music later.
Exercise: Set a timer for 5 minutes. Play through those four notes in as many different orders as you can think of. It’s ok if you repeat yourself.
Exercise: Repeat the previous exercise, but this time, do it over an A minor backing track. I like the backing tracks from N&M Creation, but any will do.
Stage 1 Summary
- Work with the top two strings of the scale
- Play those 4 notes, 20 times in a row to program your muscle memory
- Set a timer for 5 minutes and play those notes in all sorts of different orders.
- Grab a backing track and play those notes in as many different orders as you possibly can, for the duration of the backing track
Stage 2
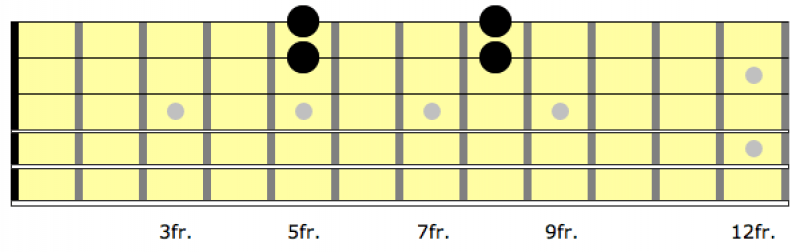
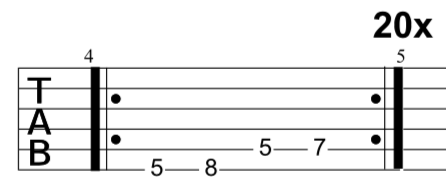
The next step, is to work with the middle two strings of the scale:

and we work through the same process as before.
Exercise: Play those notes 20 times in a row to program them into your muscle memory:
Exercise: Take a backing track, and play those four notes in as many combinations as possible.
Stage 2 Concept Shift Breaking your ideas down into phrases At this stage, it is very common for beginner guitar players to play one huge stream of notes. Think of your improvising like a book. If you read a book, that was a single sentence stretched over 90 pages… the book is going to totally suck.
Improvising is similar.
We want to break our improvising into short, discrete sentences, or phrases.
Now, at the moment, you probably aren’t too sure how to do that. That is ok!
All you are going to do… is play 3-4 notes, then let the last note you played ring out.
- 3-4 notes
- rest
- 3-4 notes
- rest
- 3-4 notes
- rest
That’s it. Nice and easy.
Exercise: Take the backing track you used, and repeat the exercise where you played these notes in different orders, but this time, add a pause every 3-4 notes.
Stage 2 Summary
- Work with the middle two strings of the scale
- Play through those 4 notes, 20 times
- Play them in different orders over a backing track
- Repeat Step 3, adding a pause every 3-4 notes.
Stage 3
Next, we work on the two bottom strings of the minor pentatonic scale:

Exercise: Play just those 4 notes 20 times in a row:
Exercise: Grab an A minor backing track, and play the notes in mixed up orders, leaving a pause every 3-4 notes. Do this for the duration of the backing track.
Stage 3 Concept Shift Changing the rhythm of your phrase Another thing I see very commonly with students approaching improvising for the first time, is for the student to play every note with the same length.
So try this.
In each phrase you play, play some notes longer than others.
Exercise: Play over the backing track again. This time, vary the rhythm of the notes, between the pauses.
Stage 3 summary
- Play the bottom two strings of the scale 20x in a row to memorise the notes
- Play over a backing track, mixing up the orders of the notes
- Repeat Step 2, changing the rhythm of the 3-4 notes inside your phrase
Conclusion
So there you have it, a simple process to getting started improvising, even if you are brand new to guitar!
Once you worked through the scale in string pairs, you can work through by choosing two pairs and putting them together, and then, by using the whole scale - by this stage you will be able to remember the scale a lot more effectively.